git 使用 webhook 实现自动部署博客
使用webhook,实现自动化部署
一、在github上配置webhook
在如下路径做如下配置:
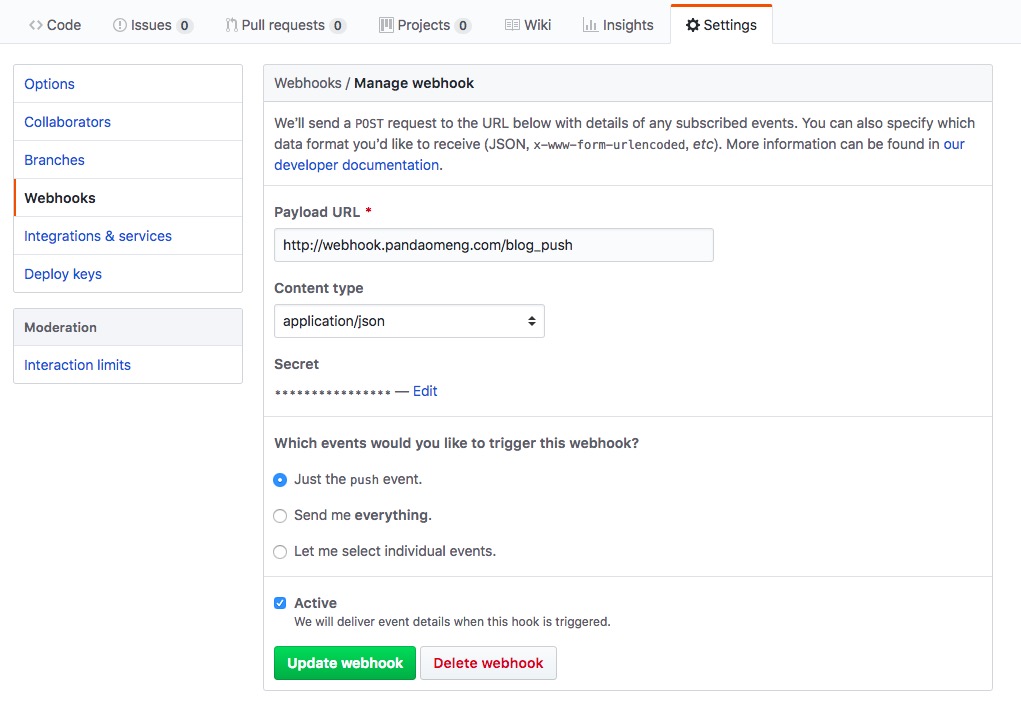
解释:
- Payload URL:触发git事件时,请求的接口路径,下面我们会用node写对应的controller
- Secret:填写的密码,写controller接口的时候用到
- Just the push event:这里我们只响应push事件
二、在自己的服务器上编写响应的接口
前提:服务器上有node环境
创建项目路径
1
mkdir -r /home/ameng/webhook
初始化为node项目
1
2
cd /home/ameng/webhook
npm init一路回车后,项目就创建完毕了
安装需要的依赖
1
npm i github-webhook-handler
编辑index.js
1
vim index.js
1
2
3
4
5
6
7
8
9
10
11
12
13
14
15
16
17
18
19
20
21
22
23
24
25
26
27
28
29
30
var http = require('http');
var spawn = require('child_process').spawn;
var createHandler = require('github-webhook-handler');
// 下面填写的myscrect跟github webhooks配置一样,下一步会说;path是我们访问的路径
var handler = createHandler({ path: '/blog_push', secret: 'Zxcvbnm123' });
http.createServer(function (req, res) {
handler(req, res, function (err) {
res.statusCode = 404;
res.end('no such location');
})
}).listen(7777);
handler.on('error', function (err) {
console.error('Error:', err.message)
});
// 监听到push事件的时候执行我们的自动化脚本
handler.on('push', function (event) {
console.log('Received a push event for %s to %s',
event.payload.repository.name,
event.payload.ref);
// ./run.sh 就是我们监听到push事件的时候执行的脚本
runCommand('sh', ['./run.sh'], function( txt ){
console.log(txt);
});
});
function runCommand( cmd, args, callback ){
var child = spawn( cmd, args );
var resp = '';
child.stdout.on('data', function( buffer ){ resp += buffer.toString(); });
child.stdout.on('end', function(){ callback( resp ) });
}编写测试用脚本
1
vim run.sh
1
2
3
4
#!/bin/bash
filename="`date \"+%Y-%m-%d %H:%M:%S\"`.test"
touch "$filename"1
chmod 755 run.sh
启动项目
1
node index.js &
配置nginx
编辑文件
/etc/nginx/sites-enabled/webhook1
2
3
4
5
6
7
8
9
10
11
12
13server {
listen 80;
server_name webhook.pandaomeng.com;
access_log /var/log/nginx/access_webhook.log;
error_log /var/log/nginx/error_webhook.log;
location / {
index index.html index.htm;
proxy_pass http://localhost:7777;
proxy_set_header X-Real-IP $remote_addr;
client_max_body_size 100m;
}
}重启nginx
1
nginx -s reload
测试,进行一次推送,结果如下

我们看到我们的run.js脚本生效了
将 run.js 的内容设置为我们的博客部署脚本就ok了
run.js1
2
3
4
5
6
7
8#!/bin/bash
cd ~/myhexo/source/_posts
git pull
cd ~/myhexo
hexo g
rm -rf /var/www/html/
cp -r ~/myhexo/public/ /var/www/html成功!接下来只要每次push新的博客,网站就会相应地更新了。
注意事项:
执行
node index &之后,如果你改动文件,需要重新启动在步骤8的测试环节,通过以下命令,查看请求是否到达
1
tail -f /var/log/nginx/access_webhook.log